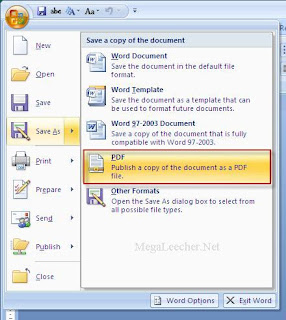
Configure Default Mode for Numlock Key

Configure Default Numlock Mode

Quick Overview:

The Numlock key on most standard keyboards toggles the numeric keypad between two different modes: (1) The Numeric Mode and (2) The Function Mode.

When the Numlock is turned "ON", the numeric keys on the keypad generate numbers, from 0 to 9. On the other hand, when Numlock is set to "OFF", these numeric keys generate other keystroke events such as "Home", "Page Up", "Page Down", etc...
Many versions of Windows by default, set Numlock key to "OFF", and this turns to be a bit annoying if you use that keypad regularly for numeric purposes. The good news is, you can always change this default behavior and set the Numlock key ON as default.
IMPORTANT This article will guide to some steps of modifying your Windows Registry. Stop if you're not familiar with the Windows Registry. Making an inappropriate change to the Windows Registry could cause critical problems to your computer.
Proceed at your own risks
  1. Open the "Registry Editor" ("Start" >> "Run", then type "regedit" and Enter).
  2. Expand to the following key:
    HKEY_CURRENT_USER\Control Panel\Keyboard
  3. Here you should see a string value named "InitialKeyboardIndicators"
  4. Double-click on this name to popup the edit window
  5. Enter a desired numeric value under "Value Data" then click "Ok". Valid values are:
    0: Numlock is OFF on startup
    1: Disable Numlock Key
    2: Numlock is ON on startup

Microsoft Internet Explorer Shortcut Keys

Mouse shortcuts
Shortcut Description
Double-click (On a word) Select the word.
Triple-click Select entire line.
Wheel click Activate the Smooth scrolling
Hold Ctrl + Scroll Wheel forward Increase font size
Hold Ctrl + Scroll Wheel backward Decrease font size
Click one point then hold Shift & click another Create a selection from the two points


Keyboard shortcuts

Shortcut Description
F1 Help.
F3 Toggle on/off search panel.
F4 Pull down address bar.
F5 Refresh current page.
F6 Move focus to address bar.
F11 Toggle on/off full-screen mode
Alt + (Left Arrow) Go back on history. Same pas Backspace
Alt + (Right Arrow) Go forward on history.
Ctrl + A Select All.
Ctrl + B Favorites.
Ctrl + C Copy Selected.
Ctrl + E Search panel.
Ctrl + F Find (on page).
Ctrl + H Toggle History panel.
Ctrl + I Toggle Favorites panel.
Ctrl + L Open File. Same as Ctrl + O
Ctrl + N Open New browser window.
Ctrl + P Print current page / frame.
Ctrl + R Refresh. Same as F5
Esc Stop (while page is loading).
Ctrl + Enter Auto complete a url address.
Ctrl + D Add the current page to favorite.

Microsoft Excel Shortcut Keys

Microsoft Excel Shortcut Keys

The followings are Microsoft Excel shortcuts. Some short-cuts might be version specific.
Use at your own risk.
Mouse shortcuts

Shortcut Description
Double-click (on a cell) Edit the cell contents.
Double-click (on a row/column divider) Adjust height/width to auto-fit
High-light headers of multiple rows/columns then Double-click on a row/column divider Adjust height/width to auto-fit of all high-lighted rows/columns
Triple-click Select the entire contents in the cell
Click on row/column divider then drag Adjust height/width of the row/colunn
High-light headers of multiple rows/columns then Click on row/column divider then drag Adjust height/width of the rows/colunns
Ctrl + Mouse wheel Zooms in and out of document.
Hold Shift + Click the cells Select multiple cells


Keyboard shortcuts

Shortcut Description
F2 Edit the selected cell.
F5 Goto a specific cell. For example, C6.
F7 Spell check selected text and/or document.
F11 Create chart.
Ctrl + A Select all.
Ctrl + B Bold.
Ctrl + C Copy.
Ctrl + F Find (same as Shift + F5).
Ctrl + G Go To.
Ctrl + H Replace.
Ctrl + I Italic.
Ctrl + K Insert link.
Ctrl + N New Workbook.
Ctrl + O Open Workbook.
Ctrl + P Print dialog.
Ctrl + S Save.
Ctrl + U Underline.
Ctrl + V Paste.
Ctrl + Z Undo.
Ctrl + Y Redo.
Ctrl + X Cut.
Ctrl + 5 Strikethrough text.
Ctrl + F3 Define Name.
Ctrl + F4 Exit Excel.
Ctrl + F6 Switch between open workbooks.
Ctrl + F9 Minimize current window.
Ctrl + F10 Maximize current window.
Shift + F1 Activate Help on Item.
Shift + F2 Insert Comments
Shift + F3 Insert Function.
Ctrl + Shift + ; Enter the current time.
Ctrl + ; Enter the current date.
Ctrl + Page down Move to next worksheet.
Ctrl + Page up Move to previous worksheet.
Ctrl + Shift + # Number Format: Date
Ctrl + Shift + @ Number Format: Time.
Ctrl + Shift + ! Number Format: Commas.
Ctrl + Shift + $ Number Format: Currency
Ctrl + Shift + % Number Format: Percentage
Ctrl + Shift + ^ Number Format: Scientific.
Ctrl + Space Select entire column.
Shift + Space Select entire row.
Ctrl + (Arrow key) Move to next section.

Microsoft Outlook Shortcut Key

Shortcut Description
Ctrl + B Bold
Ctrl + C Copy.
Ctrl + F Forward a message.
Ctrl + I Italic highlighted selection
Ctrl + K Auto-Complete the name or message.
Ctrl + P Paste selected text.
Ctrl + R Reply to a message.
Alt + S Compose a new message
Ctrl + U Underline
Ctrl + X Cut selected text.
Ctrl + N Compose a new message.
Ctrl + Shift + A New appointment to your calendar.
Ctrl + Shirt + C New contact.
Ctrl + Shift + I Go to Inbox.
Ctrl + Shift + J New journal entry.
Ctrl + Shift + K New task.
Ctrl + Shift + O Go to Outbox.

Command Prompt on Right-Click

Command Prompt on Right-Click

Many computer users, specially the programmers, need to launch a command prompt window every once in a while to execute some dos/shell commands. The problem is, when a command prompt window launched, the default path is normally the system path or the user profile's path. The users will then have to do all the "cd" commands to change the directories to the path he/she wants.
This trick shows you how to add an option called "Command Prompt" when you right-click on a folder in Windows. With this option, a Command Prompt Window will launch and its current directory will be the path to the folder you've selected.
Use this trick at your own risk.
Here's what you'll get:

The Solution
You can either edit your registry OR download the registry file and apply it on your computer.
Method I. Manually edit the registry:
  1. Start > Run
  2. Enter "regedit" and hit Enter
  3. Expand to "HKEY_LOCAL_MACHINE\SOFTWARE\Classes\Folder\shell"
  4. Right-click on "shell" and select New > Key
  5. Make sure a new key is created under "shell". Change the name of this key to "Command Prompt"
  6. Right-click on this new key "Command Prompt" and select New > Key
  7. Change the name of this key to "command"
8.Here's what we should have:
  1. Double-click on the "(Default)" text on the right window to bring up the edit box
  2. Enter this text into the Value Data field:
    cmd.exe "%1"
  3. Click OK and close the registry.
Method II. Download and apply the registry file:
  1. Download this registry file Here
  2. Unzip it to a temp folder, then double-click on the .reg file to add the registry data.


Basic PC Shortcut Keys

Shortcut Keys Supported Window Versions Description
Alt + e 95, 98, ME, NT, 2000, XP, Vista Pull down the top Edit menu.
Alt + f 95, 98, ME, NT, 2000, XP, Vista Pull down the top File menu
Ctrl + a 95, 98, ME, NT, 2000, XP, Vista Select all text.
Ctrl + c 95, 98, ME, NT, 2000, XP, Vista Copy selected item(s) (to clipboard).
Ctrl + f 95, 98, ME, NT, 2000, XP, Vista Find.
Ctrl + v 95, 98, ME, NT, 2000, XP, Vista Paste copied item(s) from clipboard
Ctrl + x 95, 98, ME, NT, 2000, XP, Vista Cut.
Ctrl + Ins 95, 98, ME, NT, 2000, XP, Vista Same as Ctrl + c
Ctrl + (left arrow) 95, 98, ME, NT, 2000, XP, Vista Move one word to the left at a time.
Ctrl + (right arrow) 95, 98, ME, NT, 2000, XP, Vista Move one word to the right at a time.
Shift + Ins 95, 98, ME, NT, 2000, XP, Vista Same as Ctrl + v
Shift + Delelte (or Del) 95, 98, ME, NT, 2000, XP, Vista Cut. Or permanently delete selected item(s) on Windows Explorer.
F1 95, 98, ME, NT, 2000, XP, Vista Help.
Home 95, 98, ME, NT, 2000, XP, Vista Jump to the beginning of the line or page.
Ctrl + Home 95, 98, ME, NT, 2000, XP, Vista Jump to the beginning of the document or page.
End 95, 98, ME, NT, 2000, XP, Vista Jump to the end of the line or page.
Ctrl + End 95, 98, ME, NT, 2000, XP, Vista ump to the end of the document or page.
Shift + Home 95, 98, ME, NT, 2000, XP, Vista Set selection (highlight) from current position to beginning of the line or page.
Shift + End 95, 98, ME, NT, 2000, XP, Vista Set selection (highlight) from current position to end of the line or page.
Shift + (left arrow) 95, 98, ME, NT, 2000, XP, Vista Set selection (highlight) from current position to the left, one character at a time.
Shift + (right arrow) 95, 98, ME, NT, 2000, XP, Vista Set selection (highlight) from current position to the right, one character at a time.
Shift + (down arrow) 95, 98, ME, NT, 2000, XP, Vista Set selection (highlight) from current position to the next line down.
Shift + (up arrow) 95, 98, ME, NT, 2000, XP, Vista Set selection (highlight) from current position to the next line up.

How to restore the windows default icons?

You can restore the all windows default desktop icons, if you accidentally deleted them from your computer desktop. 
List of windows default icons. 
  • My Computer
  • Internet Explorer
  • My Documents
  • My Network Places
  • Recycle Bin 
Here we are discussing the recovering process of four windows default icons “My Computer, Internet Explorer, My Documents and My Network Places’ and we will cover recovery process of the Recycle Bin icon in next tip.

Fellow the given steps to restore the windows default icons: 


  • Go to Start Button and open Run then type the given command to open windows Desktop items dialog box.  
  • Control desk.cpl,,@Web
  • Simple copy the above command and paste it in Run box and press Ok,  
  • Now “Desktop Items” dialog box will appear with different options. 
  • Under the “General” tab, select the all check box in “Desktop icons” area or click on “Restore default” button to restore the all default icons on your computer desktop.
  • Press OK to close the entire dialog box.

How to uninstall hidden devices, drivers using device manager?

Today tip will help you to display the hidden devices in system Device Manger. Normally windows device manager displays the information about the hardware that ever been recognized by windows, whether it is currently present in the computer or not connected to the computer (for example USB or any other removable devices). The "Show hidden devices" option on View menu would not display the all hidden information, so you can force your system to display the detail of all hidden drives.
Follow the given steps to display the all hidden information in device manager: 
To edit the computer registry, first you should log onto your computer with administrative rights.
Click Start button and type CMD in Run option then press Enter for next.
 At the command prompt, type the following command and press Enter button.
set devmgr_show_nonpresent_devices=1 
Here again type the following command at command prompt and then press Enter button.

start devmgmt.msc 
Now in the Device Manager Console go to View menu and select the "Show hidden devices" option.


Now expand the different devices and drivers option in devices manger and you will find the devices which have been loaded in the past. 
When you finish troubleshooting, close Device Manager and also exit from command prompt to clear the opened sessions.


How to solve low memory problems?


Normally this warning message shows when you run many programs same time than the RAM installed on your computer is designed to support.  Your can solve this problem by increasing the system paging file size also called as virtual memory. Using this virtual memory windows moving information to and from the paging file for fast processing.  This will free up enough RAM for other programs to run properly.
To increase the system page file follow the give path:
 
Control Panel > System > Advanced > Click on Settings (Under Performance) > Advanced > Change
Here under Drive (Volume label), you have option to select any of your hard disk drive, but the best choice is, select any drive other than C drive for virtual memory.


Set the double Initial & Maximum Size of your Virtual Memory. Here set initial size 700 MB and maximum size up to 1000MB; you can change this size according to the free space available on your hard drive.


How to connect your home computer from Remote location?


Using the Remote Desktop feature, you can connect your home computer (host) from any other remote computer (client) and can access all computer resources (installed programs, data and any network resources). You can run any computer application on the remote computer as you were running actually sitting in front of home computer. 
Follow the given steps to configure your computer to connect remote computer: 
To use this feature, you will need to be logged into your computer with administrative rights.


To perform this task, first make sure your both computers are connected to the internet. 

First you have to configure the host computer that allows the users to connect it remotely. On the host computer, right click on "My computer" and click on Properties option.
Under the Remote tab, select the option "Allow users to connect remotely to this computer" and click Ok button.

Now get the IP address of host computer (type the "ipconfig /all" on the command prompt of host computer to find IP address). 
Now make a connection on remote or client computer, click on Start button, go to All Programs> Accessories, and Communications, then click on Remote Desktop Connection, option. A Remote Desktop Connection, dialog box will appear.

Click on Options button for detail configuration, under the General tab, type the IP address of host computer in the Computer box and also type username and password of host computer then click on Connect button to make a connection to remote computer.
If your username and password is correct then a remote desktop windows will appear.


Microsoft Office 2007 Save as PDF File


Save as PDF format in an Office program

In the following list, find the 2007 Microsoft Office system program you are using to learn more about saving in PDF format.


Which program are you using?

Access

  1. Open the table or report that you want to publish as PDF.
  2. Click the Microsoft Office ButtonButton image , point to the arrow next to Save As, and then click PDF or XPS.
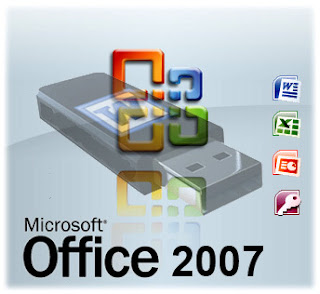
  3. In the File Name list, type or select a name for the file.
  4. In the Save as type list, click PDF.
  5. If you want to open the file immediately after saving it, select the Open file after publishing check box. This check box is available only if you have a PDF reader installed on your computer.
  6. Next to Optimize for, do one of the following, depending on whether file size or print quality is more important to you:
    • If the table or report requires high print quality, click Standard (publishing online and printing).
    • If the print quality is less important than file size, click Minimum size (publishing online).
  7. To specify various options for the file, click Options. (Find links to more information on these options in the See Also section.) Click OK.
  8. In the Publish as PDF or XPS dialog box, click Publish.
If you want to make changes to the PDF after saving it, return to your original 2007 Microsoft Office system file in which you created it and save the file as PDF again. To learn more, see Learn about PDF and XPS file formats

Excel

  1. Click the Microsoft Office ButtonButton image , point to the arrow next to Save As, and then click PDF or XPS.
  2. In the File Name list, type or select a name for the workbook.
  3. In the Save as type list, click PDF.
  4. If you want to open the file immediately after saving it, select the Open file after publishing check box. This check box is available only if you have a PDF reader installed on your computer.
  5. Next to Optimize for, do one of the following, depending on whether file size or print quality is more important to you:
    • If the workbook requires high print quality, click Standard (publishing online and printing).
    • If the print quality is less important than file size, click Minimum size (publishing online).
  6. To specify various options for the file, click Options. (Find links to more information on these options in the See Also section.) Click OK.
  7. Click Publish.
If you want to make changes to the PDF after saving it, return to your original 2007 Microsoft Office system file in which you created it and save the file as PDF again. To learn more, see Learn about PDF and XPS file formats.

InfoPath

Do the following when you are filling out a form in Office InfoPath 2007:
  1. On the File menu, point to Export To, and then click PDF or XPS.
  2. In the File Name list, type or select a name for the form.
  3. In the Save as type list, click PDF.
  4. If you want to open the file immediately after saving it, select the Open file after publishing check box. This check box is available only if you have a PDF reader installed on your computer.
  5. Next to Optimize for, do one of the following, depending on whether file size or print quality is more important to you:
    • If the form requires high print quality, click Standard (publishing online and printing).
    • If the print quality is less important than file size, click Minimum size (publishing online).
  6. Click Publish.
If you want to make changes to the PDF after saving it, return to your original 2007 Microsoft Office system file in which you created it and save the file as PDF again. To learn more, see Learn about PDF and XPS file formats.


OneNote

  1. On the File menu, click Publish as PDF or XPS.
  2. In the File Name list, type or select a name for the file.
  3. In the Save as type list, click PDF.
  4. Next to Page range, click the option that represents the portion of the notebook that you want to save as PDF.
  5. Click Publish.
If you want to make changes to the PDF after saving it, return to your original 2007 Microsoft Office system file in which you created it and save the file as PDF again. To learn more, see Learn about PDF and XPS file formats.


PowerPoint

  1. Click the Microsoft Office ButtonButton image, point to the arrow next to Save As, and then click PDF or XPS.
  2. In the File name list, type or select a name for the presentation.
  3. In the Save as type list, click PDF.
  4. If you want to open the file immediately after saving it, select the Open file after publishing check box. This check box is available only if you have a PDF reader installed on your computer.
  5. Next to Optimize for, do one of the following, depending on whether file size or print quality is more important to you:
    • If the presentation requires high print quality, click Standard (publishing online and printing).
    • If the print quality is less important than file size, click Minimum size (publishing online).
  6. To specify various options for the file, click Options. (Find links to more information on these options in the See Also section.) Click OK.
  7. Click Publish.
If you want to make changes to the PDF after saving it, return to your original 2007 Microsoft Office system file in which you created it and save the file as PDF again. To learn more, see Learn about PDF and XPS file formats.


Publisher

Save as PDF for sharing or Web distribution

If you want to share the publication in a fixed format over the Web or a network, do the following:
  1. On the File menu, click Publish as PDF or XPS.
  2. In the File name list, type or select a name for the publication.
  3. In the Save as type list, click PDF.
  4. Next to Optimize for, click Change.
  5. In the Publish Options dialog box, click the optimization in the Specify how this publication will be printed or distributed list that matches the needs of the publication. For example, if the publication will be distributed online and print quality is less important than a small file size, click Minimum size. If the quality of the printing is more important than file size, click High quality printing.
  6. Click Advanced to display the entire dialog box, and select the settings that you need. (Find links to more information on these options in the See Also section.)
  7. Click OK.
  8. In the Save As dialog box, if you want to open the file immediately after saving it, select the Open file after publishing check box. This check box is available only if you have a PDF reader installed on your computer, and if the Commercial Press option is not selected in the Publish Options dialog box.
  9. Click Save.

Save as PDF for commercial printing

If the publication is being sent to a commercial printer, do the following:
  1. On the File menu, point to Pack and Go, and then click Take to a Commercial Printing service.
  2. In the pane at left, in the How will this publication be printed? list, click the option that you want. If you will be using an offset printing service, click Commercial Press. If you will be using a high-end copy shop, click High quality printing.
  3. Click Printing Options.
  4. In the Print Options dialog box, select the options that you need. (Find links to more information on these options in the See Also section.) Click OK.
  5. Under Select an item to fix, repair any problems that Publisher has identified.
  6. Under Export, select the Create a PDF check box.
  7. Click Save.
  8. In the Pack and Go Wizard, select the location to which you want to export the file, and click Next.
If you want to make changes to the PDF after saving it, return to your original 2007 Microsoft Office system file in which you created it and save the file as PDF again. To learn more, see Learn about PDF and XPS file formats.


Visio

  1. On the File menu, click Publish as PDF or XPS.
  2. In the File Name list, type or select a name for the drawing.
  3. In the Save as type list, click PDF.
  4. If you want to open the file immediately after saving it, select the Open file after publishing check box. This check box is available only if you have a PDF reader installed on your computer.
  5. Next to Optimize for, do one of the following, depending on whether file size or print quality is more important to you:
    • If the drawing requires high print quality, click Standard (publishing online and printing).
    • If the print quality is less important than file size, click Minimum size (publishing online).
  6. To print only a selection of pages, or to specify other publishing options, click Options, and select the settings that you need. (Find links to more information on these options in the See Also section.) Click OK.
  7. Click Publish.
If you want to make changes to the PDF after saving it, return to your original 2007 Microsoft Office system file in which you created it and save the file as PDF again. To learn more, see Learn about PDF and XPS file formats.


Word

  1. Click the Microsoft Office ButtonButton image, point to the arrow next to Save As, and then click PDF or XPS.
  2. In the File Name list, type or select a name for the document.
  3. In the Save as type list, click PDF.
  4. If you want to open the file immediately after saving it, select the Open file after publishing check box. This check box is available only if you have a PDF reader installed on your computer.
  5. Next to Optimize for, do one of the following, depending on whether file size or print quality is more important to you:
    • If the document requires high print quality, click Standard (publishing online and printing).
    • If the print quality is less important than file size, click Minimum size (publishing online).
  6. Click Options to set the page range to be printed, to choose whether markup should be printed, and to select the output options. (Find links to more information on these options in the See Also section.) Click OK.
  7. Click Publish.
If you want to make changes to the PDF after saving it, return to your original 2007 Microsoft Office system file in which you created it and save the file as PDF again. To learn more, see Learn about PDF and XPS file formats.

Note   The third-party products discussed in this article are manufactured by vendors independent of Microsoft; Microsoft makes no warranty, implied or otherwise, regarding the performance or reliability of these products.

Password protect Documents, Workbooks, and Presentations


Set a password in a Word document

To encrypt your file and set a password to open it:
  1. Click the Microsoft Office Button Button image, point to Prepare, and then click Encrypt Document.
  1. In the Encrypt Document dialog box, in the Password box, type a password, and then click OK.
You can type up to 255 characters. By default, this feature uses AES 128-bit advanced encryption.      Encryption is a standard method used to help make your file more secure.
  1. In the Confirm Password dialog box, in the Reenter password box, type the password again, and then click OK.
  2. To save the password, save the file.

Remove password protection from a Word document

  1. Use the password to open the document.
  2. Click the Microsoft Office Button Button image, point to Prepare, and then click Encrypt Document.
  3. In the Encrypt Document dialog box, in the Password box, delete the encrypted password, and then click OK.
  4. Save the file.

Set a password to modify a Word document

In addition to setting a password to open a Word document, you can set a password to allow others to modify the document.
  1. Click the Microsoft Office Button Button image, click Save As, and on the bottom of the Save As dialog, click Tools.
  2. On the Tools menu, click General Options. The General Options dialog opens.
  3. Under File sharing options for this document, in the Password to modify box, type a password.
  4. In the Confirm Password dialog, re-type the password. Click OK.
  5. Click Save.
 Note   To remove the password, repeat these instructions and then delete the password from the Password to modify box. Click Save.

Set a password in an Excel spreadsheet

To encrypt your workbook and set a password to open it:
  1. Click the Microsoft Office Button Button image, point to Prepare, and then click Encrypt Document.

  1. In the Password box, type a password, and then click OK.
You can type up to 255 characters. By default, this feature uses AES 128-bit advanced encryption. Encryption is a standard method used to help make your file more secure.
  1. In the Reenter password box, type the password again, and then click OK.
  2. To save the password, save the file.

Remove password protection from an Excel spreadsheet

  1. Use the password to open the spreadsheet.
  2. Click the Microsoft Office Button Button image, point to Prepare, and then click Encrypt Document.
  3. In the Encrypt Document dialog box, in the Password box, delete the encrypted password, and then click OK.
  4. Save the spreadsheet.

Set a password to modify an Excel spreadsheet

In addition to setting a password to open an Excel spreadsheet, you can set a password to allow others to modify the spreadsheet.
  1. Click the Microsoft Office Button Button image, click Save As, and on the bottom of the Save As dialog, click Tools.
  2. On the Tools menu, click General Options. The General Options dialog opens.
  3. Under File sharing, in the Password to modify box, type a password.
  4. In the Confirm Password dialog, re-type the password. Click OK.
  5. Click Save.
 Note   To remove the password, repeat these instructions and then delete the password from the Password to modify box. Click Save.

Set a password for a PowerPoint presentation

To encrypt your presentation and set a password to open it:
  1. Click the Microsoft Office Button Button image, point to Prepare, and then click Encrypt Document.


  1. In the Password box, type a password, and then click OK.
You can type up to 255 characters. By default, this feature uses AES 128-bit advanced encryption. Encryption is a standard method used to help make your file more secure.
  1. In the Reenter password box, type the password again, and then click OK.
  2. To save the password, save the file.

Remove password protection from a PowerPoint presentation

  1. Use the password to open the presentation.
  2. Click the Microsoft Office Button Button image, point to Prepare, and then click Encrypt Document.
  3. In the Encrypt Document dialog box, in the Password box, delete the encrypted password, and then click OK.
  4. Save the presentation.

Set a password to modify a PowerPoint presentation


In addition to setting a password to open a PowerPoint presentation, you can set a password to allow others to modify the presentation.
  1. Click the Microsoft Office Button Button image, click Save As, and on the bottom of the Save As dialog, click Tools.
  2. On the Tools menu, click General Options. The General Options dialog opens.
  3. Under File sharing settings for this document, in the Password to modify box, type a password.
  4. In the Confirm Password dialog, re-type the password. Click OK.
  5. Click Save.
 Note   To remove the password, repeat these instructions and then delete the password from the Password to modify box. Click Save.


Mozilla Firefox shortcut keys


Mozilla Firefox shortcut keys

Alt + HomeGo to home page.
Alt + Left ArrowBack a page.
BackspaceBack a page.
Alt + Right ArrowForward a page.
F5Refresh current page, frame, or tab.
F11Display the current website in full screen mode. Pressing F11 again will exit this mode.
EscStop page or download from loading.
Ctrl + (- or +)Increase or decrease the font size, pressing '-' will decrease and '+' will increase.
Ctrl + EnterQuickly complete an address. For example, type computerhope in the address bar and press CTRL + ENTER to get http://www.computerhope.com.
Shift + EnterComplete a .net instead of a .com address.
Ctrl + Shift + EnterComplete a .org address.
Ctrl + Shift + DelOpen the Clear Data window to quickly clear private data.
Ctrl + DAdd a bookmark for the page currently opened.
Ctrl + IDisplay available bookmarks.
Ctrl + JDisplay the download window.
Ctrl + NOpen New browser window.
Ctrl + PPrint current page / frame.
Ctrl + TOpens a new tab.
Ctrl + F4 or Ctrl + WCloses the currently selected tab.
Ctrl + Shift + TUndo the close of a window.
Ctrl + TabMoves through each of the open tabs.
SpacebarMoves down a page at a time.
Shift + SpacebarMoves up a page at a time.
Alt + Down arrowDisplay all previous text entered in a text box and available options on drop down menu.

The General Computer Shortcuts Keys


The General Shortcuts   

We’ll kickoff the list with some really general shortcuts that you often used.
  • CTRL+C (Copy)
  • CTRL+X (Cut)
  • CTRL+V (Paste)
  • CTRL+Z (Undo)
  • Delete (Delete)
  • Shift+Delete (Delete the selected item permanently without placing the item in the Recycle Bin)
  • CTRL while dragging an item (Copy the selected item)
  • CTRL+Shift while dragging an item (Create a shortcut to the selected item)
  • F2 key (Rename the selected item)
  • CTRL+RIGHT ARROW (Move the insertion point to the beginning of the next word)
  • CTRL+LEFT ARROW (Move the insertion point to the beginning of the previous word)
  • CTRL+DOWN ARROW (Move the insertion point to the beginning of the next paragraph)
  • CTRL+UP ARROW (Move the insertion point to the beginning of the previous paragraph)
  • CTRL+Shift with any of the arrow keys (Highlight a block of text)
  • Shift with any of the arrow keys (Select more than one item in a window or on the desktop, or select text in a document)
  • CTRL+A (Select all)
  • F3 key (Search for a file or a folder)
  • Alt+Enter (View the properties for the selected item)
  • Alt+F4 (Close the active item, or quit the active program)
  • Alt+Enter (Display the properties of the selected object)
  • Alt+Spacebar (Open the shortcut menu for the active window)
  • CTRL+F4 (Close the active document in programs that enable you to have multiple documents open simultaneously)
  • Alt+Tab (Switch between the open items)
  • Alt+ESC (Cycle through items in the order that they had been opened)
  • F6 key (Cycle through the screen elements in a window or on the desktop)
  • F4 key (Display the Address bar list in My Computer or Windows Explorer)
  • Shift+F10 (Display the shortcut menu for the selected item)
  • Alt+Spacebar (Display the System menu for the active window)
  • CTRL+ESC (Display the Start menu)
  • Alt+Underlined letter in a menu name (Display the corresponding menu)
  • Underlined letter in a command name on an open menu (Perform the corresponding command)
  • F10 key (Activate the menu bar in the active program)
  • RIGHT ARROW (Open the next menu to the right, or open a submenu)
  • LEFT ARROW (Open the next menu to the left, or close a submenu)
  • F5 key (Update the active window)
  • Backspace (View the folder one level up in My Computer or Windows Explorer)
  • ESC (Cancel the current task)
  • Shift when you insert a CD-ROM into the CD-ROM drive (Prevent the CD-ROM from automatically playing)

Dialog Box Keyboard Shortcuts

  • CTRL+Tab (Move forward through the tabs)
  • CTRL+Shift+Tab (Move backward through the tabs)
  • Tab (Move forward through the options)
  • Shift+Tab (Move backward through the options)
  • Alt+Underlined letter (Perform the corresponding command or select the corresponding option)
  • Enter (Perform the command for the active option or button)
  • Spacebar (Select or clear the check box if the active option is a check box)
  • Arrow keys (Select a button if the active option is a group of option buttons)
  • F1 key (Display Help)
  • F4 key (Display the items in the active list)
  • Backspace (Open a folder one level up if a folder is selected in the Save As or Open dialog box)

Microsoft Natural Keyboard Shortcuts

  • Win (Display or hide the Start menu)
  • Win+BREAK (Display the System Properties dialog box)
  • Win+D (Display the desktop)
  • Win+M (Minimize all of the windows)
  • Win+Shift+M (Restore the minimized windows)
  • Win+E (Open My Computer)
  • Win+F (Search for a file or a folder)
  • CTRL+Win+F (Search for computers)
  • Win+F1 (Display Windows Help)
  • Win+ L (Lock the keyboard)
  • Win+R (Open the Run dialog box)
  • Win+U (Open Utility Manager)

Accessibility Keyboard Shortcuts

  • Right Shift for eight seconds (Switch FilterKeys either on or off)
  • Left Alt+left Shift+PRINT SCREEN (Switch High Contrast either on or off)
  • Left Alt+left Shift+NUM LOCK (Switch the MouseKeys either on or off)
  • Shift five times (Switch the StickyKeys either on or off)
  • NUM LOCK for five seconds (Switch the ToggleKeys either on or off)
  • Win +U (Open Utility Manager)

Windows Explorer Keyboard Shortcuts

  • END (Display the bottom of the active window)
  • HOME (Display the top of the active window)
  • NUM LOCK+* (Display all of the subfolders that are under the selected folder)
  • NUM LOCK++ (Display the contents of the selected folder)
  • NUM LOCK+- (Collapse the selected folder)
  • LEFT ARROW (Collapse the current selection if it is expanded, or select the parent folder)
  • RIGHT ARROW (Display the current selection if it is collapsed, or select the first subfolder)

Shortcut Keys for Character Map

  • After you double-click a character on the grid of characters, you can move through the grid by using the keyboard shortcuts:
  • RIGHT ARROW (Move to the right or to the beginning of the next line)
  • LEFT ARROW (Move to the left or to the end of the previous line)
  • UP ARROW (Move up one row)
  • DOWN ARROW (Move down one row)
  • PAGE UP (Move up one screen at a time)
  • PAGE DOWN (Move down one screen at a time)
  • HOME (Move to the beginning of the line)
  • END (Move to the end of the line)
  • CTRL+HOME (Move to the first character)
  • CTRL+END (Move to the last character)
  • Spacebar (Switch between Enlarged and Nor mal mode when a character is selected)

Microsoft Management Console (MMC) Main Window Keyboard Shortcuts

  • CTRL+O (Open a saved console)
  • CTRL+N (Open a new console)
  • CTRL+S (Save the open console)
  • CTRL+M (Add or remove a console item)
  • CTRL+W (Open a new window)
  • F5 key (Update the content of all console windows)
  • Alt+Spacebar (Display the MMC window menu)
  • Alt+F4 (Close the console)
  • Alt+A (Display the Action menu)
  • Alt+V (Display the View menu)
  • Alt+F (Display the File menu)
  • Alt+O (Display the Favorites menu)

MMC Console Window Keyboard Shortcuts

  • CTRL+P (Print the current page or active pane)
  • Alt+- (Display the window menu for the active console window)
  • Shift+F10 (Display the Action shortcut menu for the selected item)
  • F1 key (Open the Help topic, if any, for the selected item)
  • F5 key (Update the content of all console windows)
  • CTRL+F10 (Maximize the active console window)
  • CTRL+F5 (Restore the active console window)
  • Alt+Enter (Display the Properties dialog box, if any, for the selected item)
  • F2 key (Rename the selected item)
  • CTRL+F4 (Close the active console window. When a console has only one console window, this shortcut closes the console)

Remote Desktop Connection Navigation

  • CTRL+Alt+END (Open the m*cro$oft Windows NT Security dialog box)
  • Alt+PAGE UP (Switch between programs from left to right)
  • Alt+PAGE DOWN (Switch between programs from right to left)
  • Alt+INSERT (Cycle through the programs in most recently used order)
  • Alt+HOME (Display the Start menu)
  • CTRL+Alt+BREAK (Switch the client computer between a window and a full screen)
  • Alt+Delete (Display the Windows menu)
  • CTRL+Alt+- (Place a snapshot of the active window in the client on the Terminal server clipboard and provide the same functionality as pressing PRINT SCREEN on a local computer.)
  • CTRL+Alt++ (Place a snapshot of the entire client window area on the Terminal server clipboard and provide the same functionality as pressing Alt+PRINT SCREEN on a local computer.)

Internet Explorer navigation

  • CTRL+B (Open the Organize Favorites dialog box)
  • CTRL+E (Open the Search bar)
  • CTRL+F (Start the Find utility)
  • CTRL+H (Open the History bar)
  • CTRL+I (Open the Favorites bar)
  • CTRL+L (Open the Open dialog box)
  • CTRL+N (Start another instance of the browser with the same Web address)
  • CTRL+O (Open the Open dialog box, the same as CTRL+L)
  • CTRL+P (Open the Print dialog box)
  • CTRL+R (Update the current Web page)
  • CTRL+W (Close the current window)